
Pull Apart Garlic Quinoa Bread

Pull Apart Garlic Quinoa Bread
I found this glorious recipe on Pinterest some time ago and since then adapted it to suit all my bread recipes. Pull Apart Garlic Quinoa Bread/ Easy Quinoa Garlic Bread is a much loved bread because we follow a healthy lifestyle and use wheat flour ( wholemeal) for all our baking.
A friend sent me a lot of quinoa, so I add that to the bread too and the outcome is absolutely wonderful.
I had the privilege of learning how to bake bread from my Aunt Rita. She was an outstanding cook and learned professional baking in Bangalore. When I was a hostellite in Madras, I used to visit her and help her in her weekend baking. That’s when I learn the secrets of baking a variety of mouth-watering cakes, biscuits, puffs, bread, and other goodies. It was one of the best periods in my life and I noted down everything in my recipe book which I still use today.
Years passed and I did not really bake bread consistently until the Pandemic forced us to stay at home. Bread was sold out every time we ventured out, so I opened up my recipe books and started baking in earnest. I had forgotten how good home-baked bread can be and felt so satisfied when my family approved of it wholeheartedly. And especially this pretty Pull Apart Garlic Quinoa Bread/ Easy Quinoa Garlic Bread.
The Finished Pull Apart Garlic Quinoa Bread/ Easy Quinoa Garlic Bread- Isn’t It Pretty?
For those who are not familiar with baking, here are some facts you need to know
- Salt has four important functions in bread, all the way from kneading to eating. Most crucially, it:
- Controls the rate of yeast fermentation
- Strengthens gluten
- Improves crust colour
- Modifies flavour
Salt is added to bread dough at approximately 1.8 to 2% of the weight of flour. Sticking to this percentage ensures there is enough salt present in the dough to do its very important job. Once you start to decrease that amount, the quality of your bread starts to decline as well. Read more at https://www.kingarthurbaking.com/
I learnt a lot from this blog and generally follow their tips in most of my baking.
2. Sugar contributes to crust color due to the caramelization during baking. High levels of sugar will result in faster formation of crust color and will give you a darker crust color. This caramelization of the crust will contribute to the taste of the finished bread. Sugar, being very hygroscopic (ability to attract and retain moisture), will also improve the shelf-life of the finished product. Without sugar, moisture evaporates from bread during baking, creating a drier loaf.
Check it out for yourself below
https://www.kingarthurbaking.com
Sugar has a few effects on bread:
- It helps make it soft and tender by absorbing some of the water and slowing down the formation of gluten strands.
- It feeds the yeast, resulting in a faster rise.
- Via caramelization, it aids in the browning of the crust.
- It acts as a preservative, keeping the bread fresher for longer (though 1tbsp probably doesn’t make a lot of difference).
- It does have some effect on the flavour.
- So those of you who are skeptical about using sugar and salt together, I do hope you understand a little more about the rules of baking.
To get back to my recipe. I use a couple of basic recipes to make all the breads we devour in my house- be it pizza or buns or focaccia or rolls or garlic bread or whatever. This is because it turns out fine when I do so. So let’s get started. The basic recipe I use is below
Or this which is more or less similar
https://theversatilehousewives.com/2021/04/03/easter-bunny-bread-easter-bunny-bread-recipe/
The Recipe For Pull Apart Garlic Quinoa Bread/ Easy Quinoa Garlic Bread
You can follow either of the above recipes to make the Pull Apart Garlic Quinoa Bread/ Easy Quinoa Garlic Bread. I added 2 tbsp crushed garlic instead of the caraway seeds , spice powder, raisins and currants.
1 portion of the risen bread using either of the above- can be sweet or savoury ( the choice is yours); 1/2 cup tomato paste ( can dilute it with a little water to make it spreadable); 1/2 cup oregano pesto ( you can use any pesto of your choice). I happened to have some oregano in my garden and wanted to use it up).
Ingredients:
1/2 cup quinoa, rinsed ( I used white)
1 1/8 cups water;
4 cups wheat flour loosely packed
3/4 tbsp instant yeast
2 tsp salt
11/8 cup low-fat milk, warm
90ml ( may require more or less ) water at room temperature
1/4 cup honey
1/8 cup olive oil
1 tsp caraway seeds
For Milk Wash:
1 tbsp milk powder
3 tbsp water
Mix and keep till required.
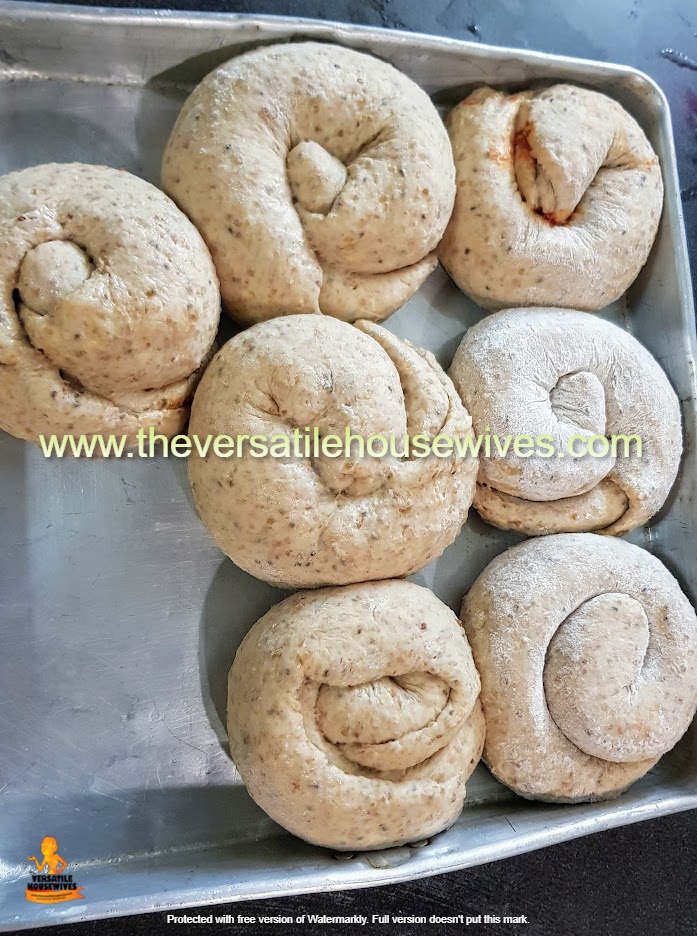
When You Place The Pull Apart Garlic Quinoa Bread/ Easy Quinoa Garlic Bread In The Pan
Method:
Once the bread is risen, punch it down lightly and divide into 12 equal sized balls. Roll each one out into a long strip and brush tomato paste on 6 and oregano pesto on 6 down the centre as carefully s you can. Avoid the edges. Roll each strip tightly and place in a a greased 8 inch round pan or square pan. Actually whatever pan you have will do. I placed one tomato and one oregano roll, side by side to make it look pretty. You can just throw the whole lot in if you like. Cover with cling film or a kitchen cloth and wait for the rolls to rise. Bake in a preheated oven at 175 Celcius or 350 F for about 40 minutes until golden brown or until skewer inserted in centre comes out clean. Keep in mind that every oven is different, so it may take a few minutes longer or get ready in less time. You can apply a milk wash if you want to. I do it if I feel like it. I can’t stand the egg wash and prefer the milky version :). If you have applied the milk wash, take the buns out after 30 minutes and apply the 2nd milk wash ( for a glossy finish) and bake for 10 minutes more. Cool in oven and slice and serve or serve as it is. I sliced the rolls lengthwise to show the swirls in the rolls. It’s one of the prettiest breads I’ve made and am feeling very proud of myself. Devour your Pull Apart Garlic Quinoa Bread/ Easy Quinoa Garlic Bread.
NB: The first time I made Pull Apart Garlic Quinoa Bread/ Easy Quinoa Garlic Bread, I was so excited, I did not bother to divide the dough into equal parts which is why I got just 7. It’s best to weigh the dough and divide it into equal portions for best results.
You can apply the milk wash just before putting the rolls into the oven or when you put it into the pan and keep it aside for rising. I prefer to do it just before baking it, as it’s less messier for me)!
Milk Wash:
1 tbsp milk powder; 2 tbsp water
Mix to a smooth, creamy consistency. You might have to add a little more water so as to brush it over the rolls easily.
Click Here To See The Reviews For Some of The Online Classes I Have Done


Fill In This Form And Submit To Book A Class With Me


Leave a Reply
You must be logged in to post a comment.